Pages
▼
Thursday, January 29, 2015
The Year of Green Frugality
Summer's over, school is back, and it's time to get back to work. And, in my case, to put my new year's resolutions up on the blog!
This year is all about saving. Saving money, and knocking that mortgage down, down, down, and saving the earth by being as environmentally friendly as we possibly can.
We've always been a pretty green-minded family, but the last couple of years have almost had me in a panic regarding the state of our earth. It is so disappointing to see our elected leaders sit on their hands whilst Rome, and everywhere else, burns.
However, there is plenty that I can do as an individual to reduce my impact. Not coincidentally, a lot of green ways are also very frugal ways, so I'm going to bring the two together and make this our Year of Green Frugality!
The rules are as follows:
- Abide by the 3 R's (reduce, reuse, recycle) as much as humanly possible.
- Think very long and hard before making a purchase. Nothing is to be bought unless it is truly needed. Ask the following questions: Do I really need this? Will it serve more than one purpose? Can it be passed on to others in good condition when we no longer require it?
- If the answer to any of those is yes, then the purchase can be made. It should be, however, at least one of the following: ethically made, second-hand and/or from an indie producer.
- Make as much as possible in the home. This will range from jam to clothes to laundry liquids. Not only will I be saving money, but I will value the things I have produced from high quality materials and will also be able to avoid environmentally destructive ingredients such as palm oil. This means that you'll probably be getting a hand-made or edible gift for your birthday. Hope you like it!
It all sounds a bit full-on, doesn't it? But truly, a lot of this is just about being more organised with my time. Mondays are going to be devoted to cleaning and cooking, so when I come home tired and stressed later in the week I can grab that pre-cooked meal from the freezer, rather than resorting to take-away and squillions of plastic containers. Which I will eat whilst admiring my mostly clean apartment. Win win!
Speaking of plastic, we are trying to avoid it as much as possible as well (like that time we went plastic-free). I'll be hitting up our local health food store and buying lots of our food from their bulk bins. It's going to be great - cooking as much as possible with fresh, non-packaged produce is going to be good for landfill AND good for my tummy!
I'm also on a mission to use up the craft supplies that I have here before even thinking about getting more. I have enough fabric for my wardrobe needs to last me a while, so I really want to work through that before I even think about justifying any new purchases. I had a major clean out last year of my fabrics and yarn, so the only things I have left have already been allocated to particular projects. Tyger will need some new things, though, so I'll have to just get my fabric kicks making things for her! I am banned from buying any new patterns, though - I have enough to sink a ship, and should really what I have. It's going to be tough, but I am determined not to crack!
We have also decided as a family to continue with some big hitting carbon reductions, such as remaining car free (using bikes, feet or public transport to get where we need to go) and to restrict meat to two meals a week, max, being veggie or vegan the rest of the time. The Galumph and I have also decided that rather than buying things for each other (things! things! the last thing we need is more things!) we will give experiences instead. Rather than a gift which we will have to find a home for and never end up using, we're going to go to concerts or exhibitions instead. My house will remain uncluttered, and I'll get a romantic night out with my husband. Ahhh, I'm liking the sound of this already!
So watch this space and see how we fare with our Year of Green Frugality. It's officially starting today - I'll keep you up to date here and on Instagram with our progress. If you have any tips or advice for me, please share - I'd love to hear your thoughts on ways we can reduce our impact!
Wednesday, January 07, 2015
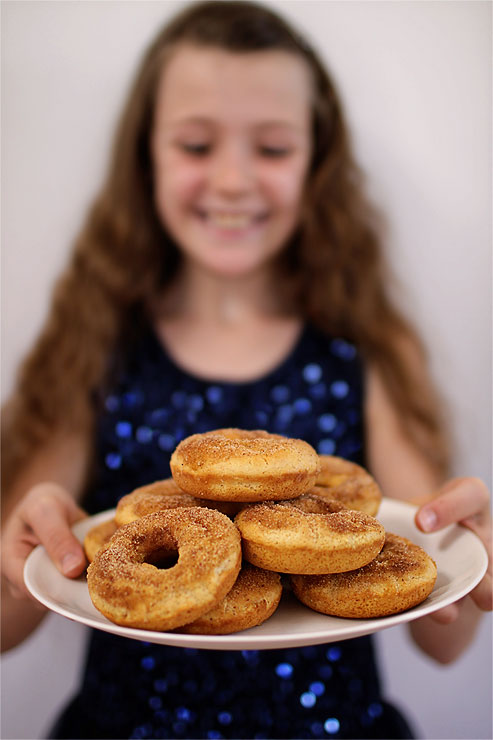
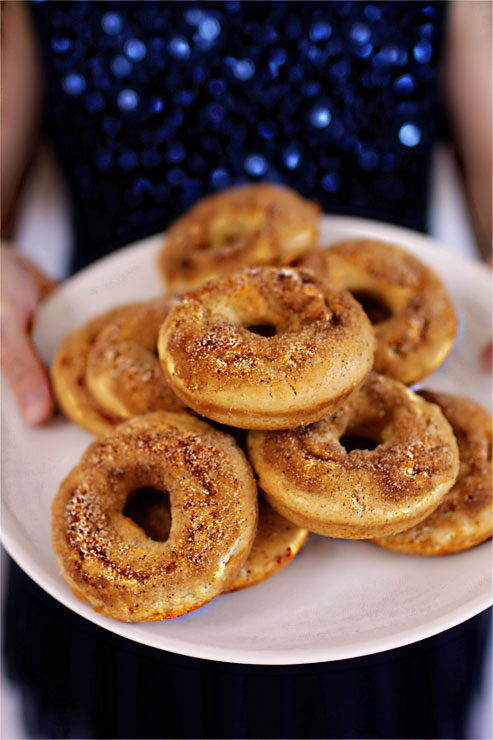
Baked Cinnamon Donuts Recipe
I have been mucking around with this recipe for the last few weeks, and I have finally cracked it. The challenge, you see, was to create the perfect donut recipe using items that I would already have in my kitchen pantry. I didn't want to be rushing down to the supermarket trying to buy yoghurts or buttermilk, or essentially anything that came in a plastic container, because we are once again trying to be as plastic free as possible here in the Jorth household this year.
We're also living a year of frugality, trying to both boost our bank account *and* be as green as possible. Everything - even donut recipes - now need to meet our green frugality standards!
So you can imagine how excited I was when I created a lovely green donut recipe, with all ingredients coming in either recyclable glass or paper. But the best thing is the donuts have that essential stick-to-the-roof-of-your-mouth-ness that only a really good cup of tea or coffee can dislodge. It's the number one thing I look for in a donut, and now the perfect recipe is mine, all mine! Cue evil laugh, and get baking, kids!
Baked Cinnamon Donuts
60 grams butter, melted
1/2 cup raw caster sugar
1 1/2 cups plain flour
2 tsp baking powder
Pinch of salt
1 tsp nutmeg, or more to taste
1 egg, beaten
1/2 cup milk
Cinnamon Topping:
20 grams butter, melted
1/2 cup raw caster sugar
1 tbsp. ground cinnamon
1 - Preheat oven to 180 C. Generously coat a donut pan with some of the melted butter.
2 - Combine the caster sugar, plain flour, baking powder, salt and nutmeg in a bowl and mix well.
3 - Mix the egg, milk and butter together in a small jug. Make a well in the centre of the flour mixture, and pour in the egg mixture. Stir well to combine.
4 - Carefully, using both a spoon and a knife, add the mixture to the donut pans, making sure you don't overfill them. Bake for 15 - 18 minutes, or until golden brown.
5 - Meanwhile, add the raw caster sugar and cinnamon together in a shallow bowl, and mix well. When the donuts are fresh out of the oven, dip each donut top in the melted butter, then press into the cinnamon sugar mixture. Place on a rack to cool, then eat - that's if you can wait that long!
Makes 8 donuts.
Monday, January 05, 2015
Pattern Review: Simplicity 1876
Helllloooooo, 2015! Boy, am I glad to see you! 2014 was one of the most eventful years I've had in a while, and I'm kinda glad to see the end of it. There were some amazing things that happened - we went to Europe, and I started a new job at Woolarium, which I LOVE - but my father-in-law became quite ill, there were job upheavals for my husband, and I've had a few rather unpleasant medical issues which have been ongoing for some time but really decided to bite towards at the end of the year. 10 years down the track from Tyger's birth, and I'm still dealing with medical issues from the complications. Gah! No fun, I tells ya, no fun at all! No wonder I totally lost my sewing mojo, eh?
But here we are, in a fresh new year, and things are looking much rosier. I'm feeling in a much better place to meet challenges head on, and have even got a few sewing projects finished. I KNOW! Hold the presses, folks - Jorth has actually finished a sewing project. Woo hoo!
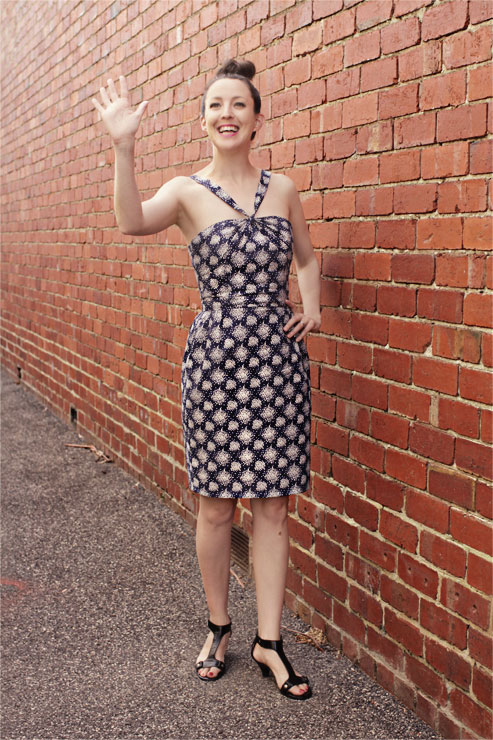
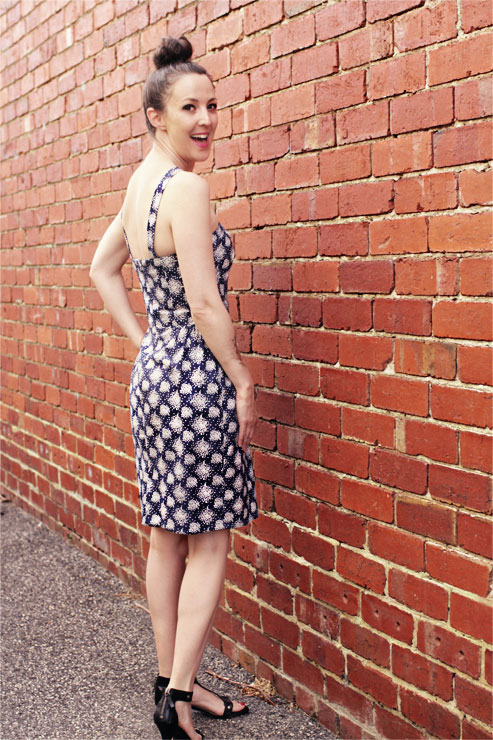
This little baby is Simplicity 1876, made up in a gorgeous fresh cotton print that I knew had to be mine as soon as I clapped eyes on it. The bodice is fully lined and interfaced, and was meant to have boning as well, but I felt that the interfaced layer would provided enough support. And besides, I like to breathe. So like the sewing rebel that I am, I left it out.
I also decided to make the halter straps into shoulder straps, as I really dislike the feeling of something being tied around my neck. I'll leave the weight-bearing yoke feelings to the oxen in ye olde fields, and go with shoulder security instead. Thankfully the halter strap was plenty long enough to accommodate this whim of mine, so no alterations were required.
The dress itself was pretty easy to sew. The only tricky part was sewing the interfacing layer to the bodice without catching the gap left to thread the halter through. There may have been some unpicking before I scored, but triumphant I did emerge, and it all sits quite nicely.
So there it is. With an invisible hand-sewn hem, to boot! I think it's a winner. Judge for yourselves - and happiest of new years to you all!
Project Details
Pattern: Simplicity 1876, view A
Fabric: 1.9m cotton fabric from GJ's Discount Fabrics
Notions: 35cm invisible zipper, interfacing
PS: Big thanks to Tyger for the pics!

